Top 6 Film Photography Mistakes and How to Avoid Them
It’s no secret to anyone who has ever shot film that there’s a steep learning curve. Just when you’ve figured something out about your camera or your film another problem crops up and you end up with a blank roll. It can be extremely discouraging to put money, time, and creative energy into a hobby that keeps disappointing you. Here are 6 mistakes I see most often with film photography and how to avoid them. This blog is primarily aimed at beginners but always a good refresher if you haven’t picked up your camera in a while.
Use code TOP6 with on nicefilmclub.com and receive 10% off your first order.
1. Incorrectly Loading the Film
This is the first step in the entire process, and no one is immune to messing it up.
How to Avoid It:
Familiarize yourself with your camera’s film loading mechanism in a calm, well-lit setting. Practicing with a dummy roll can help you become comfortable with the process. There is a YouTube video on how to load pretty much every film camera out there. Even though it can be nerve wracking to do this yourself don’t rely on lab techs or film shop workers to always do it for you. This is something you will have to learn if you want to continue shooting film so get it out of the way and practice till you’re confident.
The main thing to ensure is that the film leader (the thin strip at the end of the film) is correctly inserted into the take-up spool. Some cameras have a small diagram inside the back panel showing how to properly engage the film leader.
After closing the camera back, advance the film slowly while watching the rewind knob or lever. If it rotates with the advancement of the film, this indicates that the film is properly engaged. If not, it may be necessary to reopen the back and reattempt loading.
2. Exposure Errors
Both overexposure and underexposure can significantly affect the quality of your photos, rendering them unusable. Lots of people struggle with this well into their film photography journey. Learning how to properly expose your film to light when you first start shooting will save you so much time, money, and heart ache in the future.
How to Avoid It:
Invest in a reliable handheld light meter or use a light meter app to determine the correct exposure settings for your environment. Investing in an external light meter will help you actually learn shutter speed/aperture relationships. Lots of people using a film camera’s internal light meter will just move nobs until the needle hits the middle, which is not a reliable way to expose your film.
Practice shooting in various lighting conditions to develop a feel for how film behaves. Start with simple scenarios, like photographing in daylight with few shadows, then move to more complex lighting. Meter for both the shadows and the highlights to understand how film reacts. Under and overexpose a stop and write down which frames you experimented on to review the results later.
Understand the relationship between shutter speed, aperture, and film speed (ISO). Experiment with different combinations in controlled environments to see the effects firsthand.

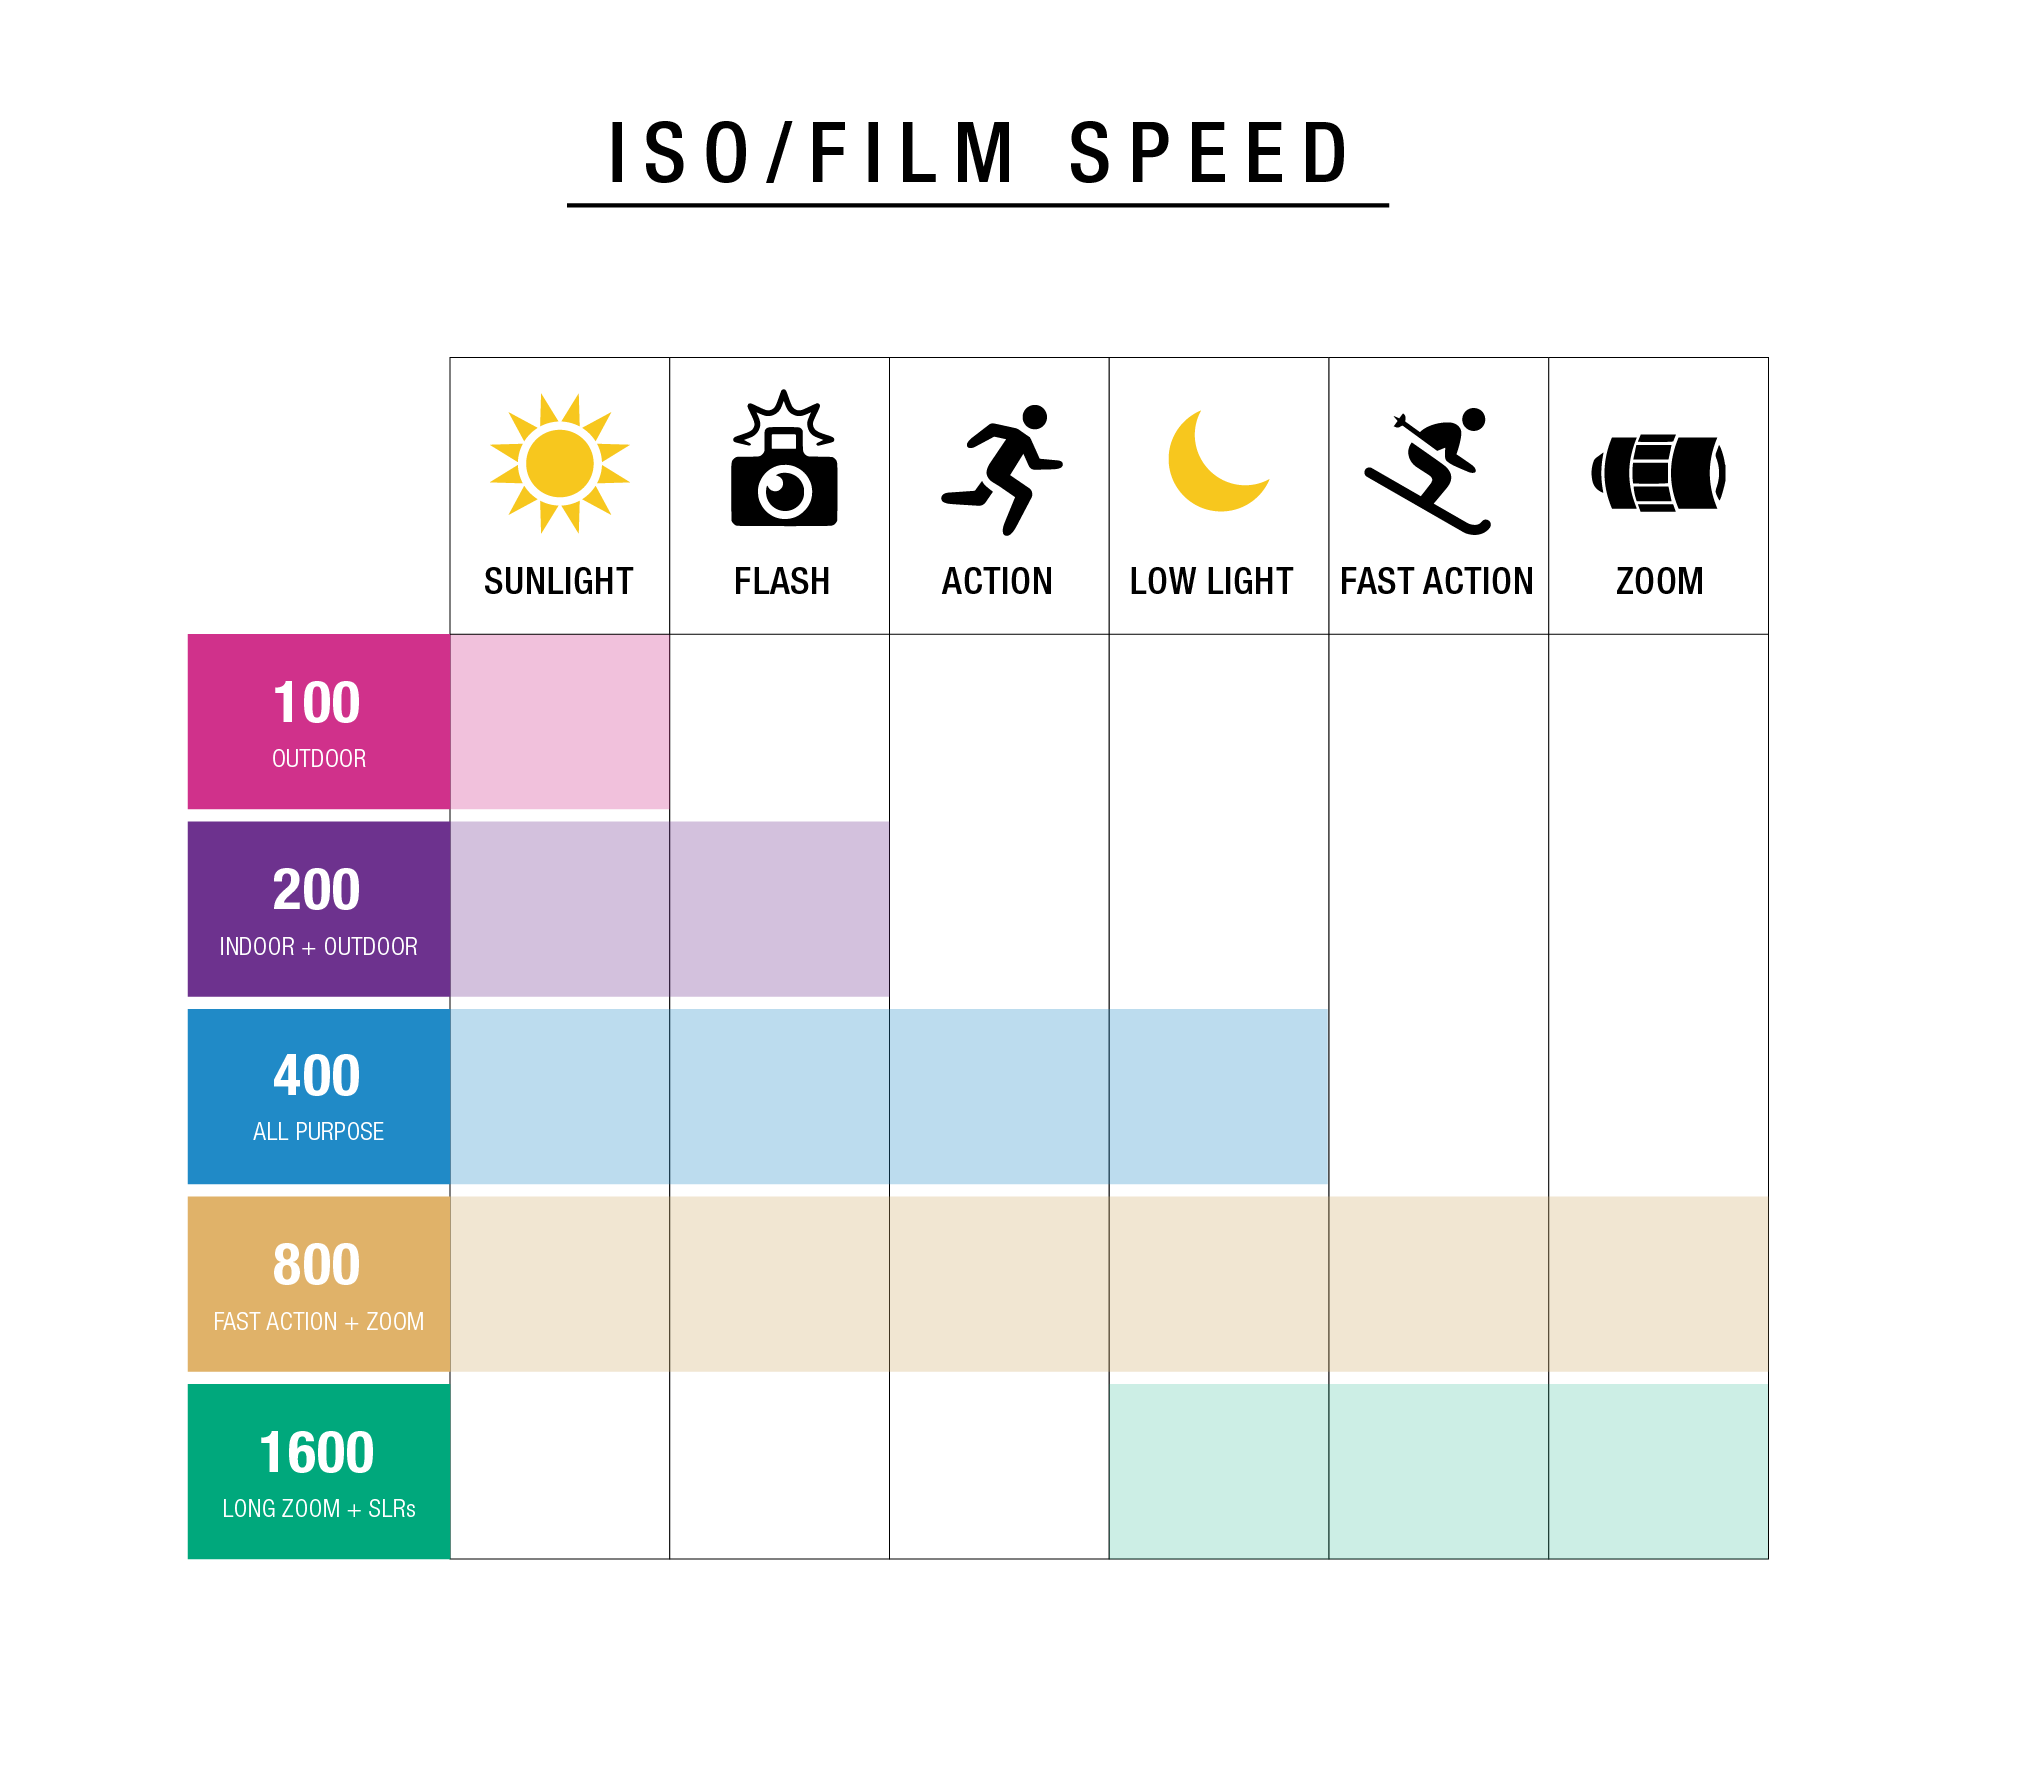
3. Forgetting to Set the ISO
Setting the wrong ISO can lead to photos that are too dark or too light, as the camera's metering will be off. Remember ISO on a film camera refers to the sensitivity of the film to light, which is indicated by a numerical value such as 100, 400, or 800. A lower ISO number means the film is less sensitive to light and requires more exposure to achieve a proper image, making it ideal for brightly lit situations. The choice of ISO affects not only the exposure but also the graininess of the final image, with higher ISO films typically producing more visible grain.
How to Avoid It:
Develop a routine of setting your ISO as soon as you load your film. This is especially crucial if your camera does not detect ISO automatically.
Use reminders if necessary. A small piece of tape on the camera with the ISO written on it can be a helpful visual reminder until you develop the habit.
Double-check your ISO setting if you resume shooting with a film camera that’s been unused for some time, ensuring it matches the film currently loaded.
4. Neglecting Maintenance of the Camera
Old film cameras are prone to a variety of mechanical issues that can impact the function and quality of your photos. They need to be cared for and often serviced much more than a digital camera.
How to Avoid It:
Conduct regular checks for common issues such as light leaks, shutter accuracy, and lens cleanliness. Use a flashlight to inspect the camera in a dark room to see if light leaks through the body. If your film camera has been sitting on the shelf for awhile it doesn’t hurt to fire the shutter and test the aperture just to make sure nothing is locking up or sticking.
Get your film camera serviced by a professional who specializes in vintage models. They can clean, lubricate, and adjust (commonly known as a CLA) the mechanics of your camera to ensure it operates as intended. A CLA is just like getting your oil changed in your car, a necessary maintenance requirement to preserve the longetivity of your tool.
Learn some basic maintenance skills yourself, like cleaning your lens and camera body properly, which can prevent many common issues.
5. Unloading the Film Incorrectly
Unloading film incorrectly is a common mistake that can expose the film to light, resulting in fogged or completely ruined film photos. Too often film shooters will get everything right then end up exposing their film from a few simple mistakes.
How to Avoid It:
Always rewind the film in a subdued light environment, if not in complete darkness. This minimizes the risk of accidental light leaks that can occur even in cameras with good seals. This is also a great safe guard in case you open your film camera back and the film is not completely rewound.
Familiarize yourself with the rewind process specific to your camera. Many cameras have a release button that needs to be engaged before rewinding can begin. Ensure you press this button before attempting to rewind the film. Usually this is located on the bottom or side of your film camera.
Rewind the film slowly and listen carefully. Stop immediately if you feel resistance, as forcing the film can cause it to tear. Once the rewind knob or lever feels loose, indicating the film is fully rewound into the canister, it’s safe to open the back of the camera. You can also tell the film is rewound when the slight amount of pressure you feel during the wind releases, and the soft clicking noise changes pitch.
Handle the film gently once removed from the camera. If it’s not going directly to a development lab, place somewhere where things like moisture and heat, won’t affect the roll. The fridge is a great place to store shot film.
6. Not Adjusting for Parallax Error
Parallax error is a common issue in some film cameras, especially those with separate viewfinders for framing and lenses for taking the photo, like rangefinder film cameras and many types of point-and-shoot cameras. Essentially, because the viewfinder and the lens don't share the same perspective, what you see through the viewfinder isn't exactly what the lens sees. This discrepancy is most noticeable when taking close-up shots.
This can be confusing but imagine looking at an object through a window, and then pressing your camera against the glass to take a photo. Your view through the window (similar to the viewfinder) is slightly different from what the camera's lens sees directly against the glass. This means that the image you thought you framed perfectly in the viewfinder might actually be slightly off in the captured photo, with the subject potentially being misaligned, partially cut off, or not in focus as intended.
How to Avoid It:
Understand how your viewfinder works. For cameras with a separate viewfinder and lens, learn how the view differs from what the lens captures, particularly at closer ranges.
Practice with your camera to get a sense of how different distances affect framing. Take note of any guide marks in your viewfinder designed to help correct for parallax.
When shooting subjects at close range, adjust your composition slightly to ensure that your subject remains within the desired frame. If your camera has a parallax correction feature, learn how to use it effectively.
Review misaligned frames on your scans. See if the subject is more often too high, low, or left/right of where you want them to be. By understanding where specific errors are in your composition, you can correct this in future rolls. Be patient with yourself, figuring out these slight corrections can be frustrating but so much more satisfying when your compositions start to look exactly how you imagined them.
If you’re new to film photography or needed a refresher, hopefully this was helpful! If you enjoyed this post please leave a comment and visit nicefilmclub.com for all your film development and scanning needs.